6. Sewing the Sections to the Cover
Part of
the Bookbinding Tutorial
|
Now, you're ready to sew your sections into your book cover! The long stitch I used is a fairly modern modification of an ancient style of bookbinding; the basic rules are simple: Sections of the book are sewn into the cover one at a time, in sequence, from the front of the book to the back, using a single length of thread to sew the entire book. In sewing each section, the thread runs once down the length of that section, alternately inside the fold of the section and outside the spine of the cover.
The thread is always sewn inside the fold of the section at each end of the book; except at the ends, the threads of successive sections alternate, so that the sewing pattern on the back of a finished book (with 4 sections in this example) should look something like is shown in Figure 6.1:
|
|
The book is sewn with a single thread, between the indicated points. Note that it takes a bit of cleverness to sew the ends of the sections, since the natural alternation of over and under brings the thread out somewhat randomly in one or the other orientation.
The thread should always pass over the end of each section and around the end of the spine. This helps prevent the pages from tearing out, because tears almost always begin at the end of the crease.
Before you start sewing, you need to measure out enough thread to sew the entire book. For a book with 19 or 20 sections, wrap the thread 10 times around the handfull of sections when they're clenched tightly in the cover. Then wrap one or two turns for good luck. It's better to have a bit of extra thread than to have to knot the thread in midbook!
Before you start sewing, it helps (but is not strictly necessary) to wax the thread with beeswax. To do this, clamp the thread against a block of beeswax with your thumb and pull it through with your other hand. The thread will tend to cut a slot in the wax, so keep changing the angle of pull to even out the wear on the wax. Do this two or three times with the full length of thread before you start sewing.
A note of caution: You do your final quality control check when you commit yourself to sewing in a section! Once the wrong section is sewn in or the right one is sewn in with a missing or inverted page, it's no fun to undo. Check what section you are sewing, and make sure it is all there and right-side up! As you gain experience, you'll find that you spend less time checking, but it's better to do too much checking than too little.
Also, with each section, check that all the pre-punched holes line up with the slits in the cover. If they don't you've probably got the section upside down. If they still don't line up, you've done a bad job punching the holes, and you'll have to repunch a few.
Figure 6.2 shows, in some detail, is a cross section of the knotting at the end of a thread:

|
Try to keep the knot and the loose end on the inside of the book. A tight square knot will do well here. Start by making the knot at one end of the first section, and finish sewing the first section to the spine. At the end, you'll face a problem -- how to finish one section and start the next.
Here, in some detail, is the sewing pattern used to change from one section to the next. If the thread emerges from the end of a section in the crease of that section, go outside the cover and down into the first prepunched hole in the next section, then out the crease, over the spine, and through the same hole as you begin sewing the length of the next section.
If the thread emerges from the end of a section outside the spine, go around the end and down the crease, re-using the last hole in the same section before going outside, around the end of the next section, and up the crease.
In both cases, the above sewing pattern will produce the result shown in Figure 6.3:
|
Here, dashed lines are used to show threads that are tucked into the crease of a section, while double horizontal and diagonal lines show the threads visible from the outside of the spine.
Whenever you use the same hole twice, always be sure not to sew the thread through itself. Pull the thread that goes through the hole off to one side, then thread the needle through to the other side of the same hole. If you do accidentally sew through the thread, it will make it difficult to tighten the thread when you're done sewing.
As you reach the end of the book, it will get hard to squeeze the last few sections in. You'll have to press hard to move the already bound pages down the spine to make room for the last sections, and as you work on the very last one, you'll have to squeeze the book again each time you try to get the needle through. If you measured the spine width correctly, you'll just barely manage to fit the last section in -- that's the test of a perfect fit.
If you run out of thread before you reach the end of the book, follow the instructions below for tightening the thread before you tie on a new length of thread, then tie the knot (a square knot) as close as you can to the last hole the thread passes through, Keep the knot on the inside of a crease! Do not back yourself into the situation where you have a knot that you need to pull through a hole in the sewing when you try to tighten the thread later.
Before you tie the final knot in the book, tighten the thread, working along the spine from the inital knot towards the end, pulling out any slack until the thread is uniformly tight throughout the sewing. I use a sharp awl (the same one I used to punch the holes in the sections) to do this, since it is easy to insert the tip under a tight loop of thread and pull the slack forward to that loop, tightening the previous loop. You don't need to pull too hard, but you don't want to leave any slack in the binding.
Finally, when the sewing is uniformly tight, tie the final knot, and you have a book! If the pages aren't in the right order at this point, though you'll have trouble fixing the order without cutting the thread and re-sewing!
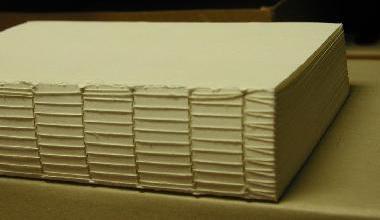
The spine of the finished book is shown in Figure 6.4. Note that the end sewing and the threads holding the center sections of the book match almost perfectly with the pattern illustrated in Figure 6.1. The pattern of the threads holding the very first and last sections is somewhat obscured by the tighter packing of these lines of sewing.
|
The book shown in Figure 6.4 has seen several years of use, and the impact of this wear is quite visible. Repeated flexing of the fold where the book front meets the spine has torn some of the surface fibers. Should this crease ever begin to tear, it would be a simple matter to thread linen tape through the sewing and glue it to the front and back covers in order to reinforce the spine and hinges. The photo shows no wear on the threads, and the torn fibers along the crease are very clean; this is because the book has been protected by a dust jacket since it was bound.