9. Alternative Binding Ideas
Part of
the Bookbinding Tutorial
|
Once you've bound a few books, it is worth exploring alternatives. Here are some variations on the basic techniques outlined in the previous sections.
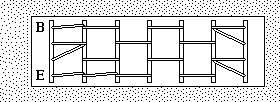
If you want to try trimming the top and bottom edge of your book, you will have to end the sewing back from the ends of each fold, instead of sewing over the ends of the folds. To do this, cut the cover and punch the pages in exactly the same way you would if you intended to sew over the ends, but treat the first hole in each section as if it was the end of the fold. Figure 9.1 shows the spine of a book sewn this way.
|
|
Once the book is sewn and the face of the book has been trimmed, you can now trim about 1/4 inch (0.5 cm) off of each end. Clamping the ends of your book will pose problems because of the swell in the binding, caused by the thickness of the thread you used in sewing the book. I find that this swell can be dealt with adequately by rounding the spine.
Most traditional hand-bound books in glued bindings have a spine which is rounded when it is glued, so it stays in that shape. With the absence of glue in a long-stitch binding, the same technique of rounding the spine is applicable, but the shape will not be permanent. What I do to begin rounding a book's spine is to squeeze the spine in my hands, working the book until the center of the back of the spine pops up against my palms. Once the book has been "urged" to give in this direction, it can be clamped along the spine (or put in a bookpress) and the clamp (or press) can be carefully tightened until the book is crushed flat and the spine bulges out.
Rounding the spine puts considerable stress on the sewing and on the cover, but I have not seen this lead to broken thread, torn paper or a torn cover because the stress seems to be distributed very uniformly throughout the structure of the binding. Nonetheless, this stress gives you reason to work carefully as you squeeze your binding!
Once you have your spine rounded, you'll be able to re-clamp first one end of the book and then the other so you can plow off the unevenness at the top and bottom of the book. Plowing through the folds at the end of the spine is a bit tricky, but if you're careful and your cutting edge is sharp and angled properly, it should pose no problems. If you're using a relatively small plowing clamp like the one I made, the big trick is to keep the book straight up when only one end of the book is clamped. If you're not careful, the end of the spine in the clamp will stay rounded while the other end swells up, and this will lead to a very awkward looking result.
Note that, in trimming the top and bottom of your book, you will gain nice glossy edges, but you lose the protection against sections tearing out that you gained by sewing over the ends of the folds. The two lose bands of cover at each end of the book don't look very good, but they can be put to good use as places to anchor the spine of a dust jacket; instead of just folding the ends of the dust-jacket's spine in, carefully tuck the end flaps under this bit of otherwise unneeded book cover.
The basic long-stitch sewing pattern allows the sections of the book to slide from side to side along the slits in the spine. Once all sections are sewn into the book and the stitching is tightened, this poses only minimal problems, but while sewing the last few sections in place, the other sections tend to rise, making it progressively harder and harder to get the final sections into the cover and pressed down far enough to sew in place.
One way to avoid this problem is to punch individual holes in the spine for each thread instead of using the slotted pattern suggested in part 4. The best way to punch these holes is to use a small punch of the type designed to punch leather, the kind with a hollow point that you strike with a hammer. Holes with a diameter on the order of half the thickness of a section of the book work well.
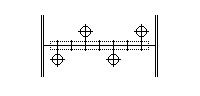
Do the spine layout, with pencil, on the surface that will end up being the inside of the spine. Mark a line the width of the spine where each slot would have been cut, if you followed the instructions in part 4, and then, for a book with, say, 4 sections, divide this line into 8 evenly sized segments with cross lines. Of these cross lines, 4 will be the centerlines of book sections; these 4 mark the locations of holes, while the other lines hint at where the edges of the sections will lie. Figure 9.2 illustrates this.
|
In each group of holes that replace one slot in the cover, it is important to avoid punching them in a straight line. This will weaken the cover enough that tear-through from one hole to another is quite likely, reducing your carefully punched holes to slots. Instead, stagger the holes to one side or the other of the centerline of the slot, as suggested in Figure 9.2. If you stagger the holes so that the threads do not overlap inside the book, the swell of the spine will be reduced, while if the overlap is in the creases of the sections, the swell will increase.
The back of the book can look quite interesting when the threads are sewn this way, and if you use colored threads in contrasting cardboard, the result can be quite decorative. Going one step farther, you can plan the punching with patterns more elaborate than zigzags in order to make a very decorative spine that does not need a book jacket. It is important to make sure that nearly half of the length of each thread passes through the crease in the section of the book, since this is the part of the thread that actually holds the sections in place! If you stagger the holes too much, or go to wild with your elaborate patterns, you may weaken the structure of the book.
The zigzag pattern of the holes in the spine of the book suggested here means that you must punch half of the book sections one way and half in another way. This, in turn, requires that you prepare two different hole punching templates. More elaborate patterns will require even more complex sets of templates, until, in the extreme, each section of the book is punched separately.
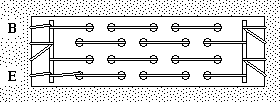
Whe the time comes to sew the sections to the cover, the sewing pattern used with punched holes is exactly the same as the pattern you would use with a slotted spine. The only difference you will encounter is that, instead of sewing sections in loosely until the very end, and then squeezing in the last few sections, you will find that you have to do a moderate amount of squeezing to get each section into place. Figure 9.3 illustrates the result you might get with a 4-section book, using a mix of slots and punched holes for binding.
|